|
• HOME • ABOUT US • BLOG • CONTACT US • CATALOG • EVENTS • TEACHING • TIPS & ARTICLES • LINKS • SITE MAP • |
||
|
Tips:
Setting
a cabochon in beadwork using square stitch
|
||
|
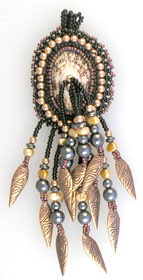
This variation on the square stitch creates a beaded bezel that will not only hold a cabochon securely but also will add beauty to whatever type of cab you choose: stone, glass or porcelain. The piece can then be embellished with fringe or accent beads and turned into a pin or necklace. Or as an alternative, you can apply the cabochon directly to a leather pouch or jacket, choosing colors that will highlight your central piece. Bezels can be created in beadwork out of either the square stitch or out of peyote. I prefer the square stitch for bezels on stones that have corners. Apply a very small amount of glue to the center back of the cabochon, and place it onto the center of your stiff stuff scrap. This holds the cab in place as you work. Try to avoid letting the glue seep out the sides, as this can make it difficult to pass your needle through once the glue has dried. Thread your needle with an arm's length of beading thread, then knot the end. While holding the cab and fabric firmly between your thumb and forefinger, push the needle up through the fabric using the edge of the cab as your guide. Make a baby stitch to secure it.
This is also a great time to go ahead and draw out any more of the pattern you might want. All the bead embroidery I do is done with this version of the back stitch.
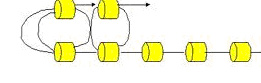
Now, let's go back to our cabochon Start adding the beads as you did above, except for a minor variation - I like to thread two beads, then go through two beads of the base row. In order to make the bezel "squeeze" around the cabochon, the upper row needs to be a little tighter than the base row - this will happen when the bezel is a bit higher than the crown of the bezel. On a shallow cabochon, this will happen on the second row. On your piece, it might happen on the third row. In order to make the top row tighter than those below, you can just reduce the number of beads evenly around the highly curved areas. Add one bead, then go through the second bead available in the base row. When you reach the end of row two, pass the thread back through the first bead of the first row, back through the last bead of the second row and all the way around the circle. Keep your tension tight, but not too tight. You don't want your work to be stiff. The beads should lie up against each other but the work should remain flexible. NOTE: Be sure you use beads with fairly large holes when working lower rows of square stitch. Delicas are perfect for this stitch. Another option to make the bezel hug around the cabochon is even easier. Just switch to size 15/0 beads for the top row. The finished row will be smaller because of the smaller size of the beads. If you want to bead embroider more pattern around your cabochon, now is the time to do it. When you are finished with your design, trim the lacy's stiff stuff as close to the beadwork as you can and use any stitch to edge your beadwork. Don't cut any of your embroidery threads! |
\ Like these tips,
articles and tutorials?
Good
River Gallery |
|

|

|
 |

|
 |
copyright © Hannah Rosner 2000-2010 ~ all rights reserved